
1. Introduction
Online security is a hot topic these days, and with good reason. One solution which all the big guys have implemented, is offering support for two-factor authentication. In lay mans’ terms: You’ll need another “code” on top of your username and password, which is generated when needed. This adds an extra layer on security.
One of the big guys who offers 2-factor authentication (in the rest of the article written as 2FA) is Google. This post helps you setup two-factor authentication for your Google / Gmail account. Enjoy!
2. Enabling 2FA in Gmail
To enable 2-factor authentication in Gmail, the following steps must be followed.
- Login to Gmail using your username / password
- Click your Profile (top right corner) (1), then click “Account(2)”

2.1 Open your account
To enable 2-factor authentication in Gmail, the following steps must be followed.
- Login to Gmail using your username / password
- Click your Profile (top right corner) (1), then click “Account(2)”
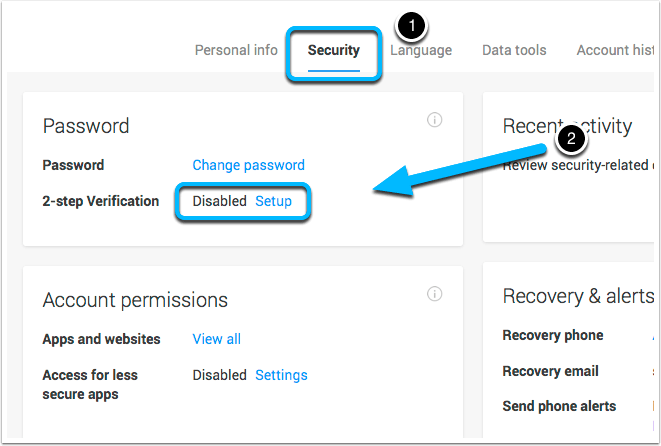
2.2 2FA Setup
- On your account page, go to the Security tab.
- In the Password section, click “Setup” next to 2-step Verification.
- Click “Start set up” on the next page to continue
2.3 Configure Phone
By default, Gmail will ask to provide a phone number to provide codes to, for 2-factor authentication purposes. This is mandatory and can’t be skipped.
- Enter a (valid) phone number
- Choose how you want to receive your codes
- Click “Send code”. Google will text or call you, to send a code, to verify you own the phone.

2.4 Verify your phone
Google will send you a text message (or call you) and provide a 6-digit code, which you need to copy
- Enter he code in the text field
- Click “Verify”

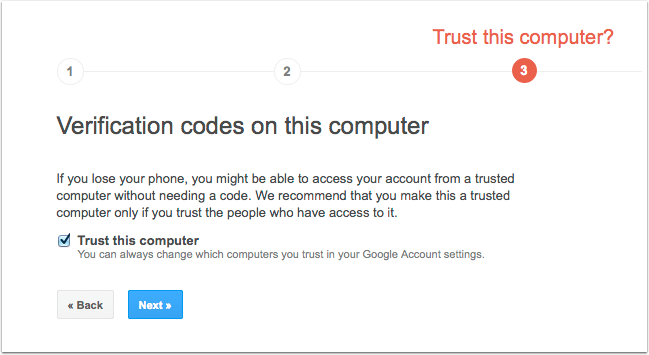
2.5 Add trusted computer
In the next screen, Google asks to make your computer a “Trusted computer”. With 2FA enabled, when you can’t receive the codes (by phone, mail or otherwise) it’s possible to access Gmail through a “trusted” computer. Make sure only to add a secure computer you own. Do not add a public computer, ever!
You can choose not to add your current computer, and add trusted computers later on.
Click Next to continue.
2.6 Confirm enabling 2-step verification
Finally, Google will aslo you to confirm that you want to enable 2-factor authentication, which will protect your account when you try to login from untrusted computers.
Untrusted computers are all computers which aren’t added to your account, but, and this is important, can also apply to other browsers on the same computer. E.G if you “trust” a comupter in Google Chrome it’s possible you’ll be asked for a 2FA code in Safari and vice versa.

3. (Optional) Configure the authentication app
You’ll now receive a code on your phone when you try to log in.
Optionally, you can use an authentication app on your phone. This app can be used without an internet / data connection.
Click “Settings” in the Security tab to start configuring this app.

3.1 Configure verification options
You’ll be presented different verification options. Configuring them is as simple as following the instructions. Other than the verification codes and the app codes which we’ve covered, you can add trusted computers (under Registered computers) or configure a “Security Key”, which is an USB device for authentication purposes.
We’ll be configuring the authentication app, under “Verification codes”.
Click “Switch to app”

3.2 Follow the instructions for your phone
Next, follow the instructions for your smartphone of choice, to install the app, and configure it. Once this is done, the app will generate a code which you can use when prompted.